Imagine you’re visiting a website for the first time, and you see something like this:

You’re going to click the back button ASAP.
Now imagine that your site is showing the same connection not secure WordPress error… no wonder sales are down; your website is turning customers away and harming your search engine rankings. Not a good look.
It’s time to fix this error and start rebuilding trust. Thankfully, it’s usually easy to fix and only involves configuring your SSL certificate.
Below, we walk you through a tutorial for solving the problem – but remember you can always reach out to our friendly StateWP experts for help if you need it!
Why Is Your WordPress Site Connection Not Secure?
WordPress connection security errors appear when your website doesn’t have a functioning SSL certificate. It could be missing, expired, or poorly configured. Without a working SSL (or secure sockets layer) certificate, you’re not running the HTTPS protocol, which encrypts data. This puts your visitors’ sensitive information at risk.
Installing an SSL certificate moves your WordPress website to HTTPS. You can tell if a site’s secure because it has a padlock icon next to the URL:

How To Fix the WordPress Connection Not Secure Error in 7 Easy Steps
Seeing that a site isn’t secure can be a bit of a shock for a website owner!
Thankfully, it’s possible to fix the error message on your own, and the steps below guide you through what to do. However, if you’d prefer some help or simply don’t have time to fix the issue, you can always call an expert WordPress developer at StateWP to take care of it!
The important thing is to take action quickly because this error costs you sales and SEO rankings!
If your WordPress connection is not secure and you want to fix it yourself, here are the steps we recommend you to take:
- Verify the status of your site’s SSL certificate
- Install a new SSL certificate (if it’s expired or missing)
b.Or, fix your certificate if it’s valid - Redirect your site’s HTTP URLs to HTTPS
- Replace HTTP entries with HTTPS entries
- Check for HTTP errors and mixed content, and replace them
- Clear local and site caches
- Update your URL in Google Analytics and Search Console
But wait! Before starting, back up your site using a plugin or your web host’s backup function. That way, if something does go wrong, you can just reload and start over. We recommend setting automated backups, so you always have a reload point in case you need help.
Let’s start securing your connection!
1. Verify the status of your site’s SSL certificate
Firstly, check if your site has a certificate with a web-based tool like Qualys, which also grades your certificate’s security.
Head to Qualys and enter your domain name in the submission box:

The tool takes a few minutes to process, and then gives you a letter grade. Click on the IP address at the top of the list to open the summary:
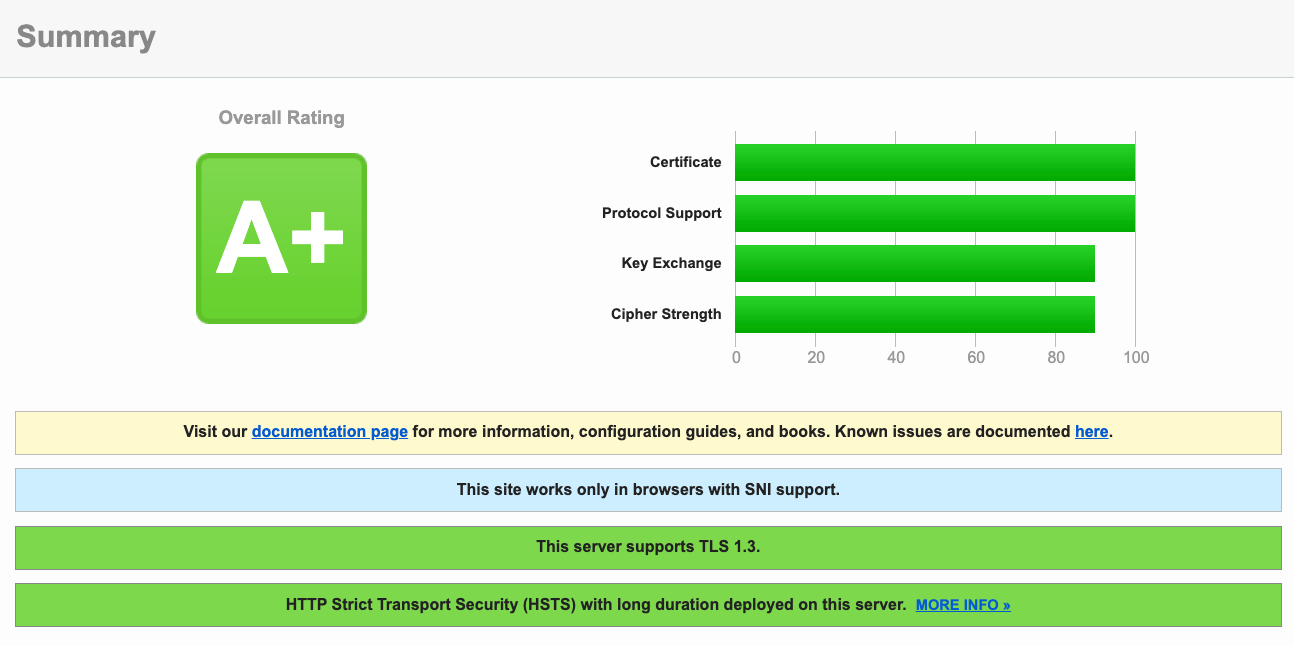
This tells you if you have a certificate, how secure it is, and when it expires.
If you don’t have a certificate, follow step 2a below. If there is a certificate, skip to step 2b.
2a. Install a new SSL certificate (if it’s expired or missing)
If no certificates appear using the checker(s), you need to install a new certificate through your web host. Let’s use WP Engine as an example.
Log into the host’s user portal and choose the WordPress site to which you want to add a certificate.
Then, select “SSL” and “Add Certificates” to proceed.

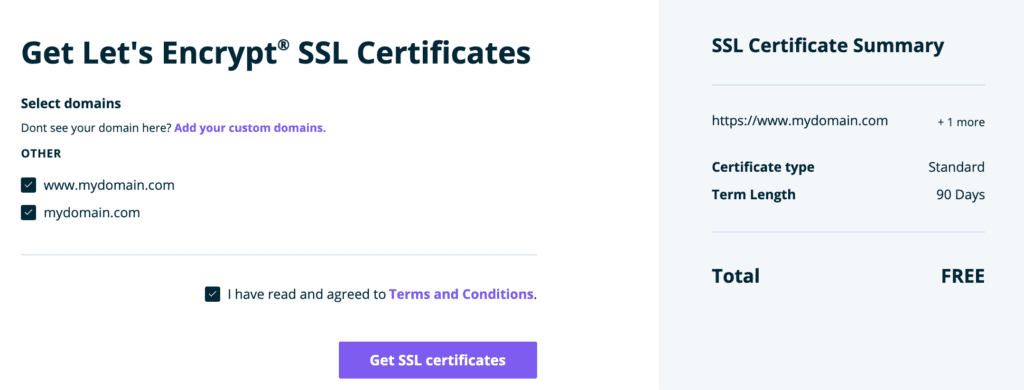
Choose your preferred certificate from the list – you can opt for a free SSL certificate from a provider like Let’s Encrypt, or go for a paid one. Paid certificates typically offer better encryption, authentication, and customer support.
WP Engine handles most of the technical aspects of moving from HTTP to HTTPS for you. However, some web hosts expect you to complete the installation manually. We run through these steps a bit further down.
WP Engine advises SSL certificates can take up to 24 hours to activate, so refresh your site regularly to see if it has been installed correctly.
2b. Fix your certificate if it’s valid
If your SSL certificate is valid, you likely need to force your site to switch from HTTP to accept HTTPS.
There are three ways you can do this:
- Use a plugin (the easiest option)
- Use a File Transfer Protocol (FTP) program
- Use secure shell (SSH), your computer’s command prompt
However, a word of warning – this is a pretty technical step, so we encourage you to contact a WordPress expert if you’re unsure.
1. Use a plugin
Search for the Really Simple SSL plugin through the Plugins tab in your WordPress dashboard, then install and activate it.

Then, choose “Settings” and “SSL” from WordPress and select “Activate SSL” on the plugin’s main screen.
The plugin advises you of a few checks to make before proceeding, such as changing HTTP references in .css and .js files. If you’re unsure what to do at this step, you can run the plugin’s Pro version (which takes care of the technical aspects for you).
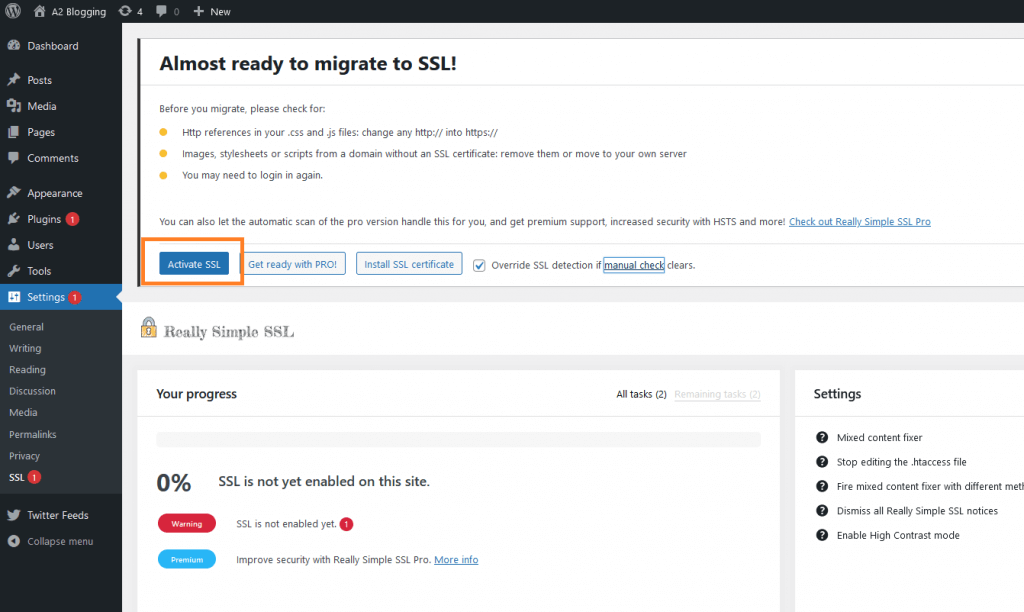
Now, click “Activate SSL” once you’re ready to proceed. The plugin reconfigures your site’s SSL, so reload your site and see if you’re now registered to HTTPS. If not, move ahead to the next step, or use a manual option from below.
2. Use FTP
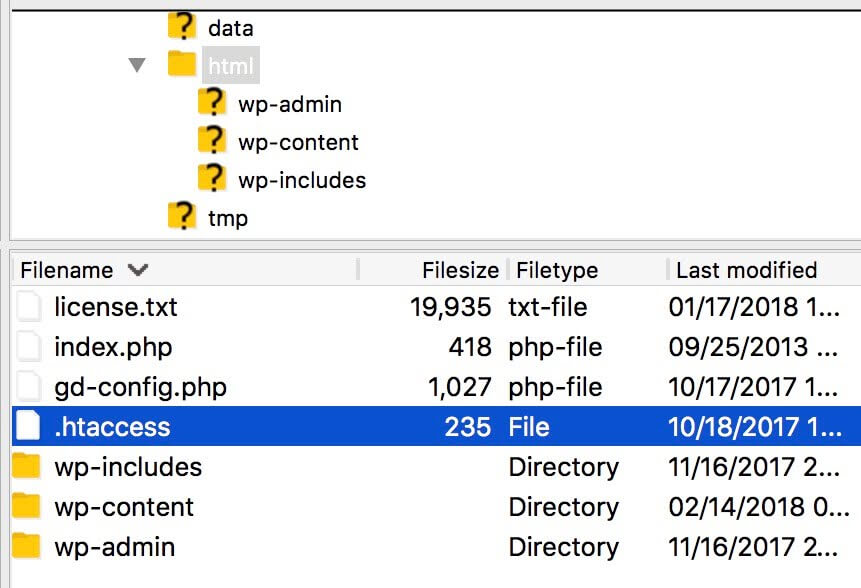
If you’re not using a plugin, we recommend you use FileZilla, a free and user-friendly FTP program. Download and install the software, and contact your web host for your FTP login details.
Log in, then look for your website’s root folder, usually called public_html – inside, there’s .htaccess, a core WordPress file. From the “Server” button in the top toolbar, select “Force showing hidden files” to reveal it.
Right-click and download a copy of the file to your local drive as a backup. Then, open it in FileZilla. You need to add some code to move your site to HTTPS.
Before the last line in the code, add:
| <IfModule mod_rewrite.c> RewriteEngine On RewriteCond %{HTTPS} off RewriteRule ^(.*)$ https://%{HTTP_HOST}%{REQUEST_URI} [L,R=301] </IfModule> |
Save the file and close the editor. Now, we need to find and download wp-config.php, another file in public_html.
Open the file in FileZilla and add the following before the end of the code.
| define(‘FORCE_SSL_ADMIN’, true); |
Save, close, and confirm. Now check your site!
3. Use SSH
First, ask your host for SSH login details and keep them handy.
In Windows, open your Command Prompt, and in MacOS, open Terminal, and enter the following code. Replace “user_name” and “ipaddress” with the details your host gave you:
| ssh user_name@ipaddress |
Now, enter your password and log in. Then, type and run:
| ls -a |
The wp-config.php file should appear in a list. To edit it, type and run:
| vi wp-config.php |
Now, press “i” and insert this code before the end of the file:
| define(‘FORCE_SSL_ADMIN’, true); |
Press “Esc”, then type :wq and run the command. This saves the file.
Now, do the same with the .htaccess file! Type and run:
| vi .htaccess |
Then, press “i” and add this code before the bottom line:
| <IfModule mod_rewrite.c> RewriteEngine On RewriteCond %{HTTPS} off RewriteRule ^(.*)$ https://%{HTTP_HOST}%{REQUEST_URI} [L,R=301] </IfModule> |
Save and exit the file as above. Check your site, and you should be on HTTPS – if not, keep reading!
3. Redirect your site’s URLs from HTTP to HTTPS
If your host or plugin doesn’t automatically redirect your URLs, you can manually set up HTTPS redirects through WordPress.
This ensures all your pages point correctly under the new, secure website protocol and that your error messages disappear!
Select “Settings” and look for “General Settings” in the WordPress dashboard.
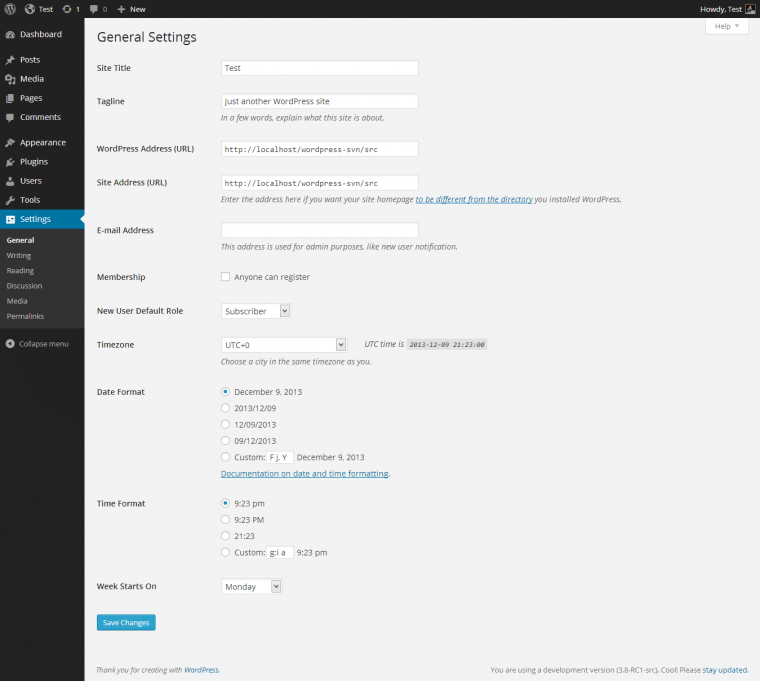
If your URLs start with HTTP, change them to HTTPS and save.
4. Replace HTTP entries with HTTPS entries
Some WP hosts help you with technical aspects of certificate installation, such as replacing HTTP entries in your database.
If yours doesn’t, we recommend using a plugin like BetterSearchReplace, a free tool you can install and activate via WordPress.
After installation, go to “Tools” in your dashboard and select the plugin, which brings up this page:

Add your website’s URL with the HTTP prefix in the “Search for” box. In the “Replace with” box, add the same URL but with the HTTPS prefix.
In the “Select tables” box, select all entries, then choose “Run as dry run” to check if the plugin works.
After the dry run, select “Run Search/Replace”, and your site address should now be on its HTTPS version.
5. Check for HTTP errors and mixed content, and replace them
Mixed content errors occur when HTTPS pages still include HTTP elements. Unsecured images and other media pose security risks because hackers can easily replace them and wreak havoc.
These errors are particularly annoying, because they can still happen even after you migrate from HTTP to HTTPS with a new SSL certificate.
To start checking for mixed content issues, head to WhyNoPadlock to scan your site – enter your secure URL, complete the CAPTCHA puzzle, and click “Test” to start.

The site now tells you if there’s any mixed content found. You’re hoping to see this:

If there is mixed content, use a plugin such as the SSL Insecure Content Fixer to clear it up.
Install and activate the plugin via WordPress and head to “Settings” and “SSL Insecure Content” in your dashboard.
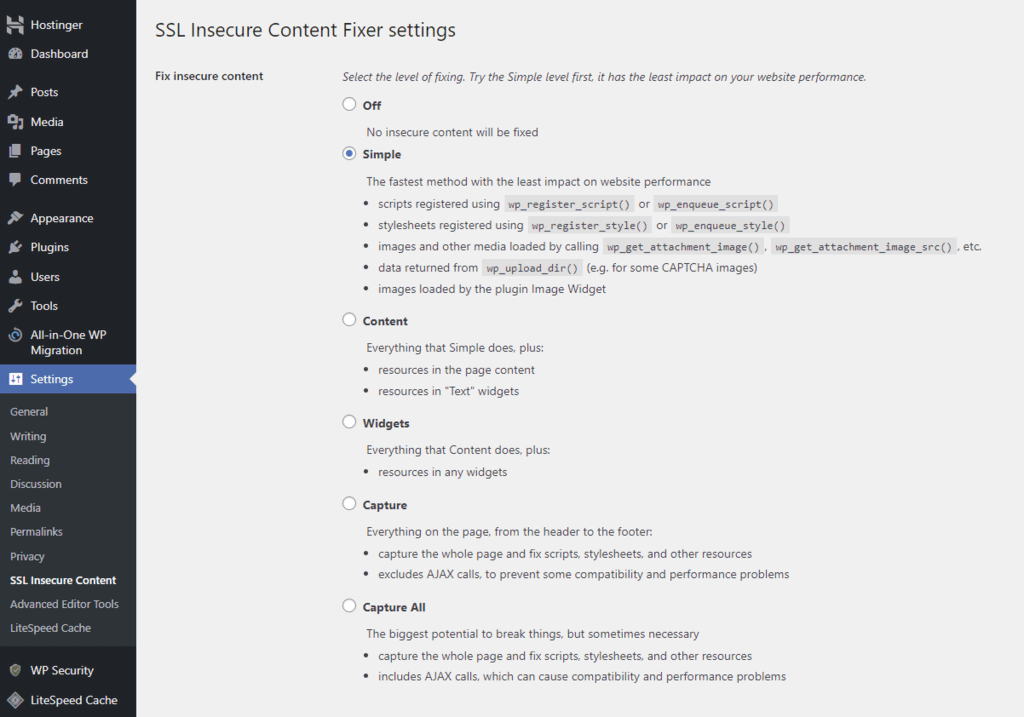
The plugin gives you several fix options. The “Simple” option is quick and fixes most issues. However, if the errors aren’t fixed, you can use the “Content”, “Widgets”, “Capture”, and “Capture All” methods to rescan your site.
A word of warning, however – you should only use “Capture All” as a last resort. Doing so can create unexpected issues for some websites.
Otherwise, if you’re happy to proceed, click “Save Changes” and reload your site.
6. Clear local and site caches
Your WordPress site might still be using outdated cache data, or your web browser’s cache might need clearing.
So, start by clearing your web browser’s cookies and cache. Then, you should recommend that anyone registered as Users or Admins on your site do the same.
You can clear your website’s cache using a plugin such as WP Rocket. Install and activate the plugin via WordPress, and follow the instructions to clear the cache. Here’s what to look for:

Some web hosts also let you clear WordPress caches. In WP Engine’s user portal, for example, select your site, then “Caching”, and click “Clear all caches”.
7. Update your URL in Google Analytics and Search Console
Lastly, you need to inform Google about your URL changes to continue indexing and ranking your site.
To update your URL in Google Analytics, log into your Search Console account and add a new property. There’s a Google Console guide that takes you through the process.
Remember, if any of the above steps seem complex, or these fixes haven’t resolved the errors – contact a developer at StateWP for expert guidance!
Troubleshooting Guide: What To Watch Out For When Fixing the WordPress Site Connection Not Secure Error
Although the above steps typically fix your connection not being fully secure in WordPress, a few common problems can occur along the way.
Here are some errors that can occur during the process and how you can fix them:
| Error | How to resolve it |
| You can no longer access the site |
1. Make sure all your URLs are correct and use HTTPS with the BetterSearchReplace plugin 2. Check your URLs are correct in “Settings” and “General Settings” in WordPress 3. Contact an expert for help |
| NET::ERR_CERT_INVALID |
1. If you installed the SSL certificate yourself, reinstall it or ask your provider for help 2. If you installed it through your host, contact its support team to fix the issue |
| ERR_SSL_VERSION_OR_CIPHER_MISMATCH |
1. Try using a different browser or device to see if the error persists 2. Use Qualys SSL to check if there are any further issues with your SSL certificate 3. If you installed via a host, check for configuration errors with its user portal 4. Ask your host or a WordPress expert for advice |
| ERR_TOO_MANY_REDIRECTS |
1. Log into FileZilla and open the wp-config.php file 2. Add the following code before the “stop editing” line: define(‘FORCE_SSL_ADMIN’, true); 3. Save the file and reload your site |
| Connection not secure errors persist |
1. Clear your browser and WordPress caches 2. Try reinstalling your SSL certificate 3. Contact a WordPress expert for help |
Prevention Guide: How To Stop the Site Connection Not Secure Error
Sick of seeing “WordPress could not establish a secure connection to wordpress.org?” Here are a few ways you can stop the error coming back.
- Ensure your certificates are up to date: Expired certificates commonly lead to the errors listed in this guide – so, use Qualys to check your certificate’s expiry date and make a note.
- Modify your external links: Always ensure any outgoing links are secured with HTTPS, which also helps to keep your visitors safe.
- Clear caches regularly: Outdated files can lead to website security errors, so empty your browser and site caches at least monthly.
- Check your SSL certificate health: Use checkers such as Qualys to ensure your certificate offers complete data encryption.
- Partner with StateWP: When you register with our WordPress maintenance service, you always have help available should errors or security issues arise again in the future! Through Proto, you can raise a service request for a response, and we’ll reply with a fix within a calendar day.

Say Goodbye to the Connection Not Secure WordPress Error
If you see the connection not secure WordPress error when you access your site, it’s not a fluke. You need to take steps to secure your site and protect your visitors’ data from falling into the wrong hands.
A WordPress address secured with a valid SSL certificate shows customers you care about their safety. What’s more, it shows Google you’re trustworthy and deserve to rank highly on your chosen keywords.
It’s usually straightforward to fix SSL problems, but if you struggle, don’t panic because it’s even quicker and easier to ask StateWP experts to fix them for you.
Dive into further reading elsewhere on our blog with our guide to the best web application firewalls and our complete guide to WordPress security.
Connection Is Not Secure WordPress FAQs
Let’s close our guide with a few frequently asked questions about the connection is not secure error.
What is a mixed content warning?
A mixed content warning occurs when an HTTPS website still uses images, media, and other content resources based on HTTP. This can lead to browsers like Google Chrome preventing websites loading these resources and error messages appearing. Read more about how to check for mixed content on your website and how to fix it in our guide.
How do you fix the ERR_SSL_PROTOCOL_ERROR in WordPress?
Check that your SSL certificate is valid with an online tool, and if it is invalid or missing, reinstall a new certificate through your website’s hosting provider. If it’s valid, use a WordPress plugin to force your site to move it across to the safer HTTPS protocol. Read our step-by-step guide on how to secure your site and remove this error.
How do you force HTTPS content in WordPress?
- Install the Really Simple SSL plugin in WordPress
- Open the plugin via “Settings” and “SSL”
- Click “Activate SSL” and read the warning message
- Reload your site
- If the plugin doesn’t work, you can also force HTTPS content using a file transfer protocol client like FileZilla, or by running commands on your device (read more above)
How do you create an SSL certificate for a website?
- Use the ICANN lookup tool and check your URL’s public record
- Create a CSR (certificate signing request) through your private server, a generator, or cPanel (via your web host)
- Submit your CSR to the authority you buy a certificate from
- Install your new certificate through cPanel
- Skip the above and purchase and install a certificate through your host instead